

When I first started teaching Pilates I felt like the Electric Chair was mostly for beginner clients. They could learn a few moves with this weirdly named piece of equipment. Then when ready move on to the Wunda Chair. And, when they had been coming awhile get to revisit it for a couple other arm exercises. I definitely felt like it took up more space then it was worth.
When I completed my training I was in two different studios, one had a combo version with a back you could lift off if you had the ability too and the other no back. I found myself gravitating to the Wunda chair and not really juicing out the why behind the Electric Chair. Writing it off as a heavier, bigger Wunda and seeing it as a slight redundancy to the studio. My first piece of Pilates equipment I invested in was a Wunda Chair. I had fallen in love and didn’t have eyes for another chair.
After years of being away from a traditional Electric Chair (also known as a High Chair) I found myself at Vintage Pilates with Jay Grimes, Sandy Shimoda and their incredible crew and space. There were two Electric Chairs. TWO!
Of course I kept my distance. I mean, I had made my love for the Wunda Chair known. Too much connection with one and not enough confidence or knowledge in the other. Until one day I couldn’t get on any other piece of equipment. It was the Electric Chair or the Ped-O-Pul. So, I made my way over, took a seat on the pad, got my back against the chair, feet on the pedal, arms around the poles and blew my mind.
With each pump of the pedal I could feel where I had been cheating my connections on my Wunda Chair. I could feel muscles turn on or turn off. I felt taller and stronger as I engaged the springs.
I made my way through every exercise I could remember and it was like coming back to an old friend. You picked up right where you left off but with more depth after years apart.
After that moment there wasn’t a week that went by where I didn’t press down that heavy pedal to see what more I could glean. And, one day when I opened my own studio I saw a one not too far away from me and I made sure it found its place in my space.
But, do you really need it? I mean, really do we need the Electric Chair? Can the Wunda Chair be enough? Is the Electric Chair just for beginners? Is it worth taking up all that space?
During one of the trainings I did with Jay Grimes I remember him saying if you only had space for one you get a Wunda chair. So, the short answer is if space is an issue maybe you just get a Wunda Chair. The Contrology Wunda Chair can meet you where you are and grow with your practice.
But, then why is there an Electric Chair? Why is it worth taking up space in your probably full studio?
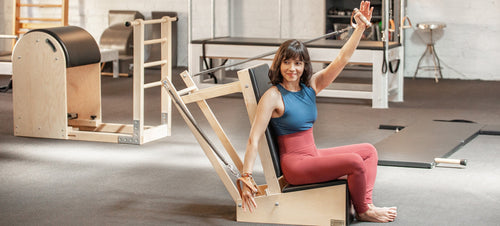
To answer this we should take a tour around the Electric Chair starting first with its size. The base of the Electric chair makes its presence known. The platform higher than your Wunda Chair base allowing a seat higher than your Wunda Chair with guides for your feet to nestle in with a high back. The top of the back of the chair has an opening and then a rail used for balance. The handles which appear to be just for balance down along the sides almost to the floor because even they are more than meets the eye. And, lastly the pedal, higher angle than your Wunda Chair with 2 heavy springs and 2 hook levels.
The springs teach as well as train you to find your center, challenge your balance and support you as you learn each exercise. The two levels allow you to use three different combinations. While most clients will likely use one spring on the top hook on one side and one spring on the bottom of the other side. Some people will need less support and can use both springs at the bottom settings. Or, some clients will need more tension and you can set both springs on the top hooks.
Now, that we have an idea of how much space and what we makes up an Electric chair we can dive into why the exercises on the Electric make it a consideration for its space taking and your need for it.
To do that lets dive into the exercises you will likely use the Electric Chair first:
Footwork
Yes, your Reformer Footwork can be done on the Electric Chair. The high back of the chair mimics your Reformer carriage, the pedal the foot bar. When you set yourself up on the pad (covering the guides) and sit back into the high back, toes onto the pedal you’re almost there. Remember those poles and handles? They are part of the action. Many believe you just hold onto the handles or wrap your arms around the poles as tight as you can. But, if you take the time to find your wide upper back using the high back, then wrap your arms as if you’re doing Hug on the Reformer you quickly discover there is more connections to discover. Engaging the pedal by pressing down with the balls of your feet, ensuring your heels are high and together will help you feel your lower body meet the action of your upper body.
As you begin to explore how low you can press into the pedal without losing your connection to the high back of the chair you start to train or retrain your body into how your legs reach out and pull back in. This out and in or up and down action is something we do in other Footwork exercises sure, but also Double Leg Stretch on the Mat, Knee Stretches on the Reformer, Leg Springs on the Trapeze/Cadillac even Breathing on the Ped-O-Pul.
The pedal teaches you that the weight of the legs or how low the pedal goes isn’t the driver. Its how you move the legs up and down from your center. All the feedback from the chair teaches you how you move your legs from your center. And, how each rep connects your center even more. Or, how you disconnect!
Closing the chain in almost every direction isn’t just a great place to learn this exercise before you move over to the Wunda Chair. Its not a prep for Footwork on the Wunda. Its a literal kinesthetic teaching tool that gives the body doing it an experience, a lesson in how they move.
Achilles Stretch
The name is one of those Pilates names that means the opposite. This foot to seat connector is another exercise you could do on the Wunda Chair. So, you may be wondering why you need the Electric Chair if yet another exercise can be done on the Wunda? The height of the chair and its pedal can often make this more accessible than the Wunda Chair height, pedal angle or, the base of the Wunda chair can make it harder to reach your knee to the chair. The resistance of the springs changes how the exercise feels in your body as you do it. The angle of the pedal changes how you engage the springs. Making this exercise teach you why exactly we point and flex in Pilates. With every reach into the pedal and resistance up you discover that every point and flex as a purpose. The shape you are in gives you more depth to your Single Leg Stretch on the Mat, Single Leg Knees Off and Single Leg Springs on the Trapeze/Cadillac. Of course, because this is the Electric Chair, if needed you can use those handles for balance.

Press Down Series
Yes, another series that exists on the Wunda Chair, however, I’m confident by the end you’ll be a little envious of my Electric Chair series access. The base of the chair lends as a guide for where your standing foot should be in all three variations. Hands on the handles allows you to find balance in an exercise that demands you have strong and good balance if done on a Wunda Chair. In fact, this series on a Wunda Chair where the springs are lighter often is not an ideal option for people who struggle with balance. Yet, this is the series that can provide the strength and mobility to improve balance.
Let’s start with the Press Down Front, one foot on the floor by the base of the chair, the ball of the other foot on the pedal, heel high. Hands on top of each handle. Pressing down allows for the upper back to find its connections and lift. As you press the pedal down and resist the pedal up you can feel the body come together to control your balance especially as the pedal lifts back up. After doing both sides you can turn to the side and set your feet up, heels together and toes apart. The inside foot touching the base helps mark where you stand. The inside hand can hold the handle in front. Lifting the inside leg up as it remains turned out and placing the ball of the foot on the pedal with the heel up. Many are tempted to lean in for this series. On the Wunda Chair that could cause you to lose your balance and control of the pedal. But on the Electric Chair the handles allow you to learn through practice and time how to work the pedal up and down. So, if on the first rep you lean a little as you continue to lower and lift the pedal you can find your place, your strength and keep your balance. The tension on the springs forces you to stay engaged where a lighter spring can often allow you to turn your connections on and off. Finally, stepping your feet towards the side of the chair, feet parallel on the floor by the base, outside foot comes onto the pedal, inside hand on handle, outside hand on hip. Getting into the Press Down Crossover isn’t easy. But, when you press into the Electric Chair pedal and begin to pump up and down you discover the genius of this series, working all parts of your hip. Challenging your balance while allowing you to hold onto its handles. One day when you’re ready you’ll take that knowledge to the Wunda Chair. Until then it readies your body for exercises like Single Leg Stretch, Side Kicks, Seal, Crab and that’s just on the Mat!
So yes, also on the Wunda Chair, but even if you make the spring heavier to feel like a High Chair you won’t have the balance support and if someone isn’t ready for the balance challenge they might not even get the pedal moving or they may not feel secure enough to do the exercise.

Going Up: Front and Side
This is where many people see the Electric Chair as a good prep tool. And, yes, you could do this on the Wunda Chair near a wall or Trapeze pole. But, you still wouldn’t fully get what the Electric Chair can uniquely teach. Remember those guides? Lift the pad up, slide it behind the high back (yes there is a little shelf for it). Using the handles to set your balance, one foot onto the pedal. Once the pedal is down you can add the other foot. Then you can place one foot along the guide for Going Up Front or Side depending on what you’re doing. The guides not only are a great teaching tool for where the foot goes but also where the knee goes when it hits the high back. Then the arms can drape over the top bar. Not only does this set up help those where balance is a challenge but it allows you as a teacher to see what is working well in their alignment. Sure, you could try to mimic it with a wall and a Wunda Chair. But the truth is the weight of the Electric chair combine with the heavy tension builds the likelihood of success in this exercise while also supporting balance. And, you can even be considered an “advanced” client and still need this set up. Too often on the Wunda chair we shift our weight back and forth or try to do too much with the top leg. The Electric Chair provides all you need to find an even reach down through your legs and up through your center.

Press Ups
Finally we meet the two exercises you cannot repeat on the Wunda Chair. No, these are not preps. They are a challenge to the arm-back connection you think you have and they bring out your inner gymnast too. The first Press Ups combine your longest Swan dive with your strongest Push Ups and your Coordination or Grasshopper beats. The Reverse Press Ups take your Long Back Arms on any piece of equipment and your leg beats from your Trapeze to the next level. Sure, you could do some Push Up Device beats or Hanging Pull Ups on your Trapeze but there’s something special about pressing up instead of pulling up.

Full disclosure I am biased. I am obsessed with my Electric Chair. Its a teacher, a friendly feedback, a strong base, full body support that allows me as a teacher to see more about what my client can do. And, truthfully teach my client all that I want them to understand not just so they can get on a Wunda Chair but so they can get more out of their Footwork, Swan, Control Push Ups, Front and Russian Splits, Star on the Reformer, Swan Dive, Leg Pulls, Jackknife on the Mat, Pull Ups, Candlestick and really anything using the top of a Trapeze/Cadillac and more. That’s just the start to the list.
If space is an issue you can just do what I did, at my old studio the Electric Chair was in the lobby. Makes a great chair. And, today, my Contrology Electric Chair is in the kitchen. Easy to make sure I use it everyday. The design of the Contrology Electric Chair, where the handles are the tension of the springs has helped me find even more strength in my center. The evidence is in my Press Up Reverse!
My teacher Jay Grimes reminded us often to not talk so much. He said the body teaches itself. We need to as teachers pick exercises that help the body find the connections it needs. The Electric Chair does this in ways that I can try to explain. But, really, I know you will feel. And that’s the best way to learn. In your body, doing Pilates.
What if instead of telling people to resist the springs so much we allowed them to be on a piece of equipment where that’s exactly what they have to do? The spring tension requires that they do just that. Get an Electric Chair and allow the exercises to teach you or your client the connections so you can focus more on what else they need and what they can do well.
Get an Electric Chair and you’ve gained a partner in your clients progress.

Lesley Logan, NCPT, MA
Owner - Profitable Pilates
Lesley, a PMA Certified Pilates Teacher, has taught the Classical Method since 2008. With years of experience in retail and studio management, she studied “The Work” under Elder Jay Grimes. Lesley appears on PilatesAnytime.com and is the author of Profitable Pilates: Everything but the Exercises, which launched her coaching business. Find courses, blogs, and webinars to grow your Pilates business. Learn more at profitablepilates.com.